 Out Off Gunchyuu Garazin 2006~2022
ハッタリ フューチャー バビュン 240Z
Out Off Gunchyuu Garazin 2006~2022
ハッタリ フューチャー バビュン 240Z
240Z 木陰で一休み

足まわり Ver UP!!

5月18日
足まわりVer UPをする準備をします。
この機会にベアリング等、消耗品は新品に交換します。
あと、下まわりチェックをします。(ドッキ・ドッキです。)
The preparations which do suspension Ver UP are done.
Bearings and consumables are exchanged newly this chance.
Also, I fall and check it. (It's DOKKI DOKKI.)
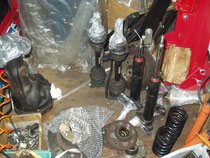
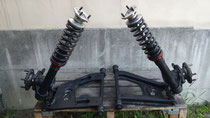
足まわりを製作中です。
R2OOデフとドライブシャトは次回に持ち越しです。作業スペースが狭!車2台分のスペースがほしい!!
Suspension is being produced.
R200 defense and DORAIBUSHATO are carrying over in next time.
A work space is kyou! I want space of for 2 cars!

まずはフロント周りからです。
フレームにダメージは見当たりませんでした。
ハウス周りは、うすらまあまあね。It's from the front turn first.
Damage wasn't found in a frame.
Even U is decent around the house, isn't it?

リア周りです。
さすがにドライブシャフトは年代を感じさせます。(換えてー!)
ハウス周りは、うすらまあまあだねー。
The rear turn.
A drive shaft makes them feel a time indeed. (I'd like to change it!)
Even U is decent around the house, isn't it?
5月24日
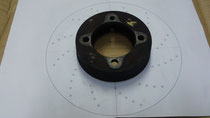
放熱とレーシーさを取り入れたローターを製作です。CADでチョコチョコと描いてプリントOUT!
ローターに張り付けてポンチで印を付けました。
左右対称に!
The rotor which took radiation and laciness in, it's making.
By CAD, restlessly, if, it's drawn and printed, OUT!
I attached to a rotor and marked by punch.
In symmetricalness!

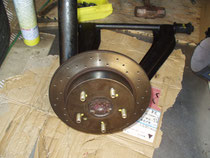
ボール盤にて穴アケ加工です。
ポンチ位置がよく見えない。。。慎重に!
(違うところにアケるなよ!)It's hole Ake processing in a boring machine.
The punch location doesn't look good. Carefully!
(Don't mistake for a different place!)

ジャーン。。。完成!!
ウ~ム・ガンダム!!(古!!)
うん。。。?ちょっとまて!ここに記載か?
Garazinのページじゃないか?まあいいか。
JAN. Completion!
Cormorant-MU and Gundam! (Old!!)
Yes.? Wait a moment! Is it mentioned here?
Isn't it a page of Garazin? Oh, would you like?
5月25日
リア側もフロントと同様に穴アケしました。
ハブボルト5穴仕様!!
5穴に、こだわるには理由があります。(理由はここでは言えましぇん!!)
Hole Ake also did the rear side like a front.
The hub bolt 5 hole specification!
It's well-founded to stick to 5 holes. (You can't say a reason here!!)
ハブフランジを外すのには苦労しました。
ナットの先が潰れているのでタガネでうまく叩いて!! 外れねー!!!
I had trouble removing hubbed flange.
It has been lost ahead of the nut, so please hit with a cold chisel well!
It doesn't come off!

リア車高調のアジャスター位置出しです。
これはデーターがなく、1発目は、おのれを信じて!!仮溶接して組んで下ろして。と、1発では無理で3発でやり直しました。
(昔は1発ヤロウだったんだけどな~。)
The adjuster location stock of the rear vehicle height style.
After there are no daters and the 1st shot of this believes itself!
Please weld temporarily, unite and drop me off. It was redone by 3 shots by force by 1 shot. (A shot of past was a shop-.)
リア車高調の完成!!
う~ん。カチョイイ!!
Completion of the rear vehicle height style!
Yes. Cool!

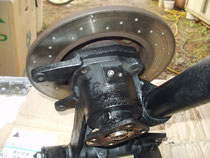
フロント側を取付します。
サクサクいきましょう!!
The front side is installed.
I'll go crisply!
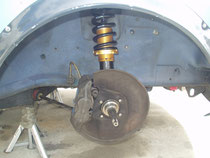
あ!ハブとローターが付いてない!!
以前にハブを取りつける際、スピンドルナットを締めすぎてしまい焼き付きさせてしまう事をやらかしました。(機械屋出でしたのでガッチリ締めろ!てね。)
素人でした。
Well! There aren't a poisonous snake and a rotor! Before
When installing a hub, please tighten a spindle nut too much.
It has been done to close and make them brand.
(It was from the mechanical shop, so finish steadily! Please.)
I was an amateur.
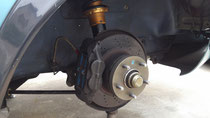
付けましたよ!!と、完成!!
グリスUP、キャリパー取付時のお約束を忘れずにしました。完璧です。
It was put! Completion!
Without forgetting the appointment which is at the time of caliper installation, grease UP was done. Perfect.
